Driveways, patios, and paver walkways experience constant exposure to vehicle traffic, changing weather, dirt, oil spills, and organic growth. Over time, these surfaces can lose their original appearance as grime accumulates, weeds emerge between joints, and stains become more difficult to remove. Regular cleaning and appropriate surface protection can help restore their appearance and support long-term maintenance.
Pressure washing driveways and pavers is an effective way to remove many types of surface dirt and buildup. However, the right approach involves more than directing a powerful stream of water at the ground. Excessive pressure can damage concrete, dislodge joint sand, and affect the finish of decorative pavers.
At Sparkle Windows, we understand the importance of using suitable cleaning methods for different exterior surfaces. In this guide, we explain how to clean concrete driveways, remove oil stains, replenish polymeric sand, and apply appropriate sealers to help maintain hardscape surfaces.
Why Is Regular Driveway and Paver Cleaning Important?
Driveways and pavers are exposed to a range of contaminants throughout the year. Vehicle tires bring in dirt, oil can drip onto concrete, and rain carries soil and organic debris across paved areas. Shaded sections may also develop algae or moss when moisture persists.
Without regular maintenance, these contaminants can make outdoor surfaces look neglected and may contribute to additional cleaning or repair needs.
Professional cleaning can help address several common problems:
Dirt and grime: Removes accumulated soil, dust, and everyday surface contamination.
Oil and grease stains: Helps loosen automotive fluids and other oily deposits with suitable cleaning products.
Organic growth: Removes surface algae, moss, and other growth where appropriate.
Weed accumulation: Clears visible vegetation, although preventing future growth also requires attention to joints and drainage.
Reduced curb appeal: Restores a cleaner appearance to driveways, patios, and walkways.
Cleaning methods should be selected according to the surface material, the type of stain, the condition of the joints, and any existing protective coating.
Pressure Washing Driveways and Pavers: Choosing the Right Technique
Concrete driveways and decorative pavers may appear similar, but they can respond differently to pressure washing. The correct equipment settings and cleaning technique help remove dirt while reducing the risk of damage.
Cleaning Concrete Driveways
Concrete is commonly used for residential driveways because it is durable and can withstand regular outdoor use. However, its surface may become damaged by excessive pressure, especially when the concrete is old, cracked, deteriorating, or finished with a decorative coating.
A suitable pressure-washing process begins with an inspection of the concrete. Loose material, existing cracks, and surface deterioration should be identified before cleaning.
A professional may use a pressure washer with an appropriate nozzle or a surface cleaner attachment to remove dirt more evenly. The selected pressure, water flow, and cleaning distance should be adjusted to the condition of the concrete.
Cleaning Decorative Pavers
Concrete pavers, brick pavers, and natural stone installations may have different surface textures and joint requirements.
High-pressure water can dislodge the sand between pavers, disturb polymeric sand, or damage fragile surfaces. Some natural stones may also be sensitive to certain cleaning chemicals.
When cleaning pavers, the technician should consider the material, joint condition, existing sealer, and manufacturer’s recommendations. The goal is to remove contamination without destabilizing the installation.
How Surface Cleaner Attachments Improve Driveway Cleaning
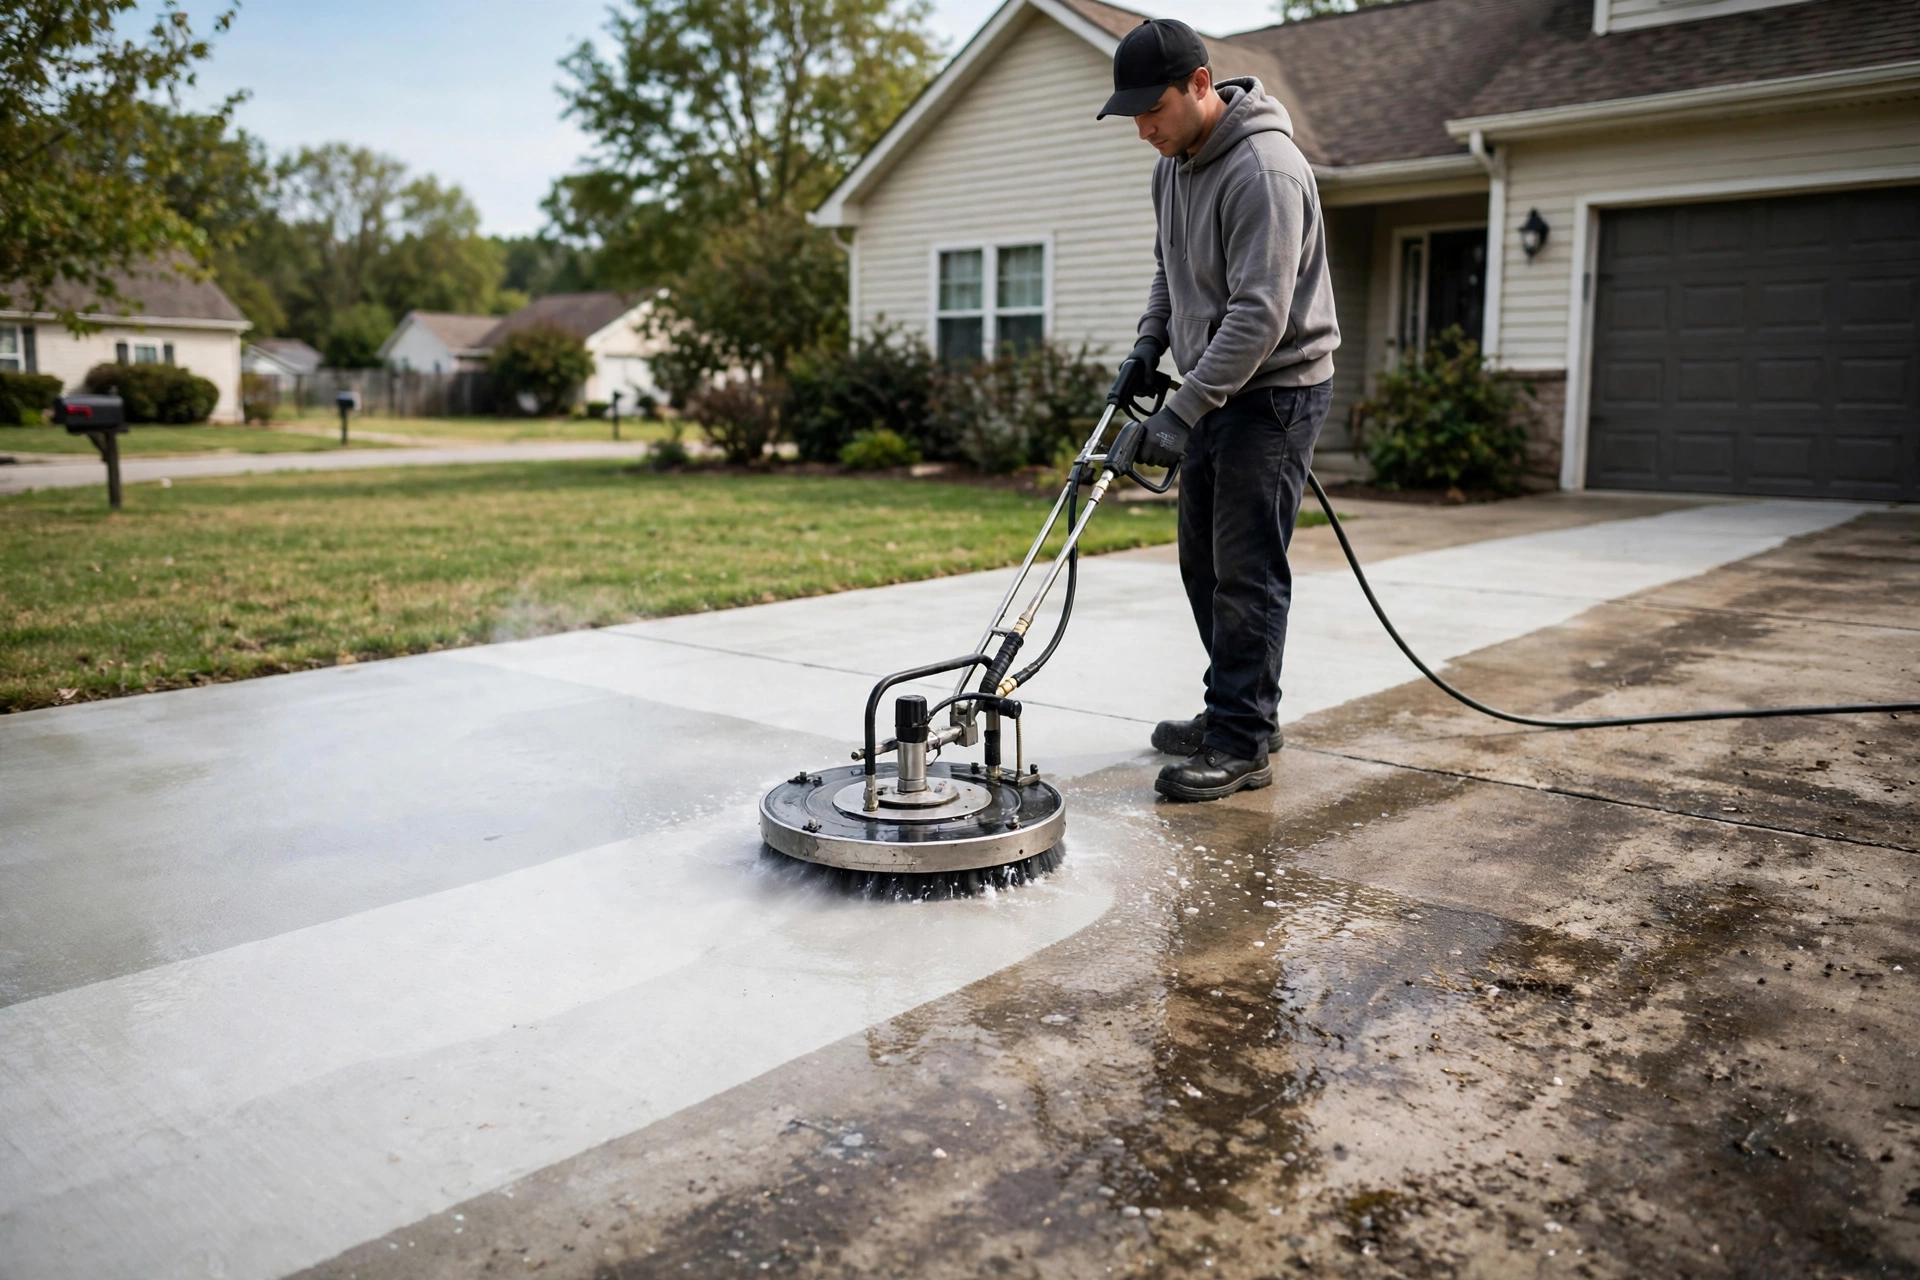
A surface cleaner attachment is a useful tool for cleaning large, relatively flat areas such as concrete driveways and suitable paved surfaces.
Unlike a standard pressure-washer wand, a surface cleaner typically uses rotating spray nozzles enclosed beneath a circular housing. This arrangement helps distribute cleaning action more evenly across the surface.
Benefits of Surface Cleaner Attachments
More consistent cleaning: The enclosed rotating spray system helps reduce uneven cleaning patterns when operated correctly.
Efficient coverage: The wider cleaning path can cover a driveway faster than cleaning every section individually with a narrow spray nozzle.
Reduced visible striping: Consistent movement and appropriate equipment settings can help minimize streak-like marks caused by uneven pressure washing.
Improved control: The housing helps maintain a more consistent distance between the nozzles and the surface.
However, surface cleaners are not suitable for every material or condition. Excessive pressure, worn nozzles, incorrect operating speed, or trapped debris can still damage concrete and pavers.
For delicate surfaces, a gentler cleaning method may be necessary.
How to Clean Concrete Driveway Oil Stains
Oil stains are among the most common problems affecting residential driveways. Leaking vehicles, lawn equipment, and other machinery can leave dark patches that penetrate porous concrete.
Fresh oil is generally easier to address than an old stain that has had time to soak into the surface. Even after thorough cleaning, some deeply embedded discoloration may remain.
Step 1: Remove Excess Oil
If the spill is fresh, absorb as much excess oil as possible using an appropriate absorbent material. Avoid spreading the oil across a larger area.
Follow local guidance for handling and disposing of oil-contaminated materials.
Step 2: Apply a Suitable Degreaser
A concrete-compatible oil stain degreaser can help loosen greasy residue. Choose a product specifically intended for the surface and stain type.
Follow the product label for dilution, application time, protective equipment, and rinsing requirements. Avoid allowing the product to dry on the concrete unless the manufacturer explicitly instructs otherwise.
Step 3: Agitate the Stain Carefully
Depending on the product instructions, gentle brushing may help lift the oil from the surface.
Avoid abrasive tools that could damage decorative finishes or create visible differences in the concrete texture.
Step 4: Rinse Thoroughly
Use an appropriate cleaning method to rinse away the loosened oil and cleaning solution. Water pressure should be controlled to prevent surface damage and unnecessary runoff.
Step 5: Assess the Results
Older stains may not disappear completely after one treatment. Additional cleaning may be possible, but repeated aggressive washing can damage the concrete.
For stubborn oil marks, a professional may recommend a specialized treatment designed for porous masonry.
Important: Oil-contaminated runoff should not be allowed to enter storm drains or waterways. Use cleaning products and disposal methods that comply with applicable environmental requirements.
What Is Polymeric Sand and Why Does It Matter?
Polymeric sand is a specialized jointing material used between many types of concrete pavers and suitable masonry installations. It contains sand and binding additives that activate when the product is installed and hydrated according to the manufacturer’s instructions.
Once properly installed and cured, polymeric sand helps stabilize paver joints and reduce the movement of sand caused by rain, wind, and normal use.
It can also help discourage weed establishment by limiting the open spaces in which seeds may settle. However, it does not guarantee complete weed prevention.
Benefits of Polymeric Sand
Joint stability: Helps keep pavers in position when correctly installed.
Reduced sand loss: Provides more resistance to ordinary weather and surface runoff than loose joint sand.
Improved appearance: Creates a more uniform finish between individual pavers.
Reduced weed establishment: Helps limit suitable spaces for weed growth.
Lower maintenance requirements: Properly installed joints can reduce the frequency of sand replacement.
Polymeric sand must be compatible with the paver material and joint dimensions. Installation also requires appropriate surface preparation, removal of excess sand from the paver faces, and careful watering.
When Is Polymeric Sand Replenishment Necessary?
Pressure washing can remove or disturb joint sand, particularly when excessive pressure is used or the joints are already deteriorating.
If the sand between pavers has become low, cracked, or washed out, replenishment may be necessary to maintain joint stability.
Signs that paver joints may need attention include:
Visible gaps between pavers.
Loose or shifting pavers.
Sand washing out after rainfall.
Weeds growing repeatedly in open joints.
Sections where the joint material appears cracked or deteriorated.
The Replenishment Process
First, inspect the paver surface and determine whether the existing joint material needs partial repair or more extensive removal.
The joints should then be cleaned and prepared according to the selected polymeric sand manufacturer’s instructions. Any damaged or unstable pavers should be addressed before the joints are refilled.
New sand is swept into the joints, and excess material is removed from the paver surface. The product is then activated using the specified watering procedure.
Proper curing is essential. Inadequate watering, excessive watering, or leaving residue on the paver faces can affect the final appearance and performance.
Because requirements vary between products, always follow the manufacturer’s installation instructions.
Paver Sealing Service: Protecting Outdoor Surfaces
A paver sealing service involves applying a suitable protective product to compatible pavers after they have been properly cleaned and prepared.
Sealers can help reduce water absorption, limit certain types of staining, and enhance the appearance of some paving materials. The results depend on the type of sealer, the paver material, the surface condition, and the environment.
Not every paver installation needs a sealer. Some products may alter the surface color, affect traction, or change how moisture moves through the paving system.
Types of Paver Sealers
Penetrating sealers: These products enter the pores of compatible materials and help reduce water absorption without necessarily creating a prominent surface film.
Film-forming sealers: These create a protective layer on the surface and may enhance color or provide a particular finish. They require careful selection and application to avoid peeling, cloudiness, or an overly slippery surface.
Joint-stabilizing sealers: Certain products are designed to help protect suitable paver joints when used as part of an appropriate installation system. They should not be assumed to replace missing joint sand.
Before sealing, confirm that the product is suitable for the pavers, existing joint material, and intended appearance.
Driveway Power Wash and Seal: What Is the Correct Order?
A driveway power wash and seal service combines surface cleaning with the application of a suitable protective coating or sealer.
The sequence matters because sealers should generally be applied to a properly prepared surface. Dirt, oil, excess joint sand, and moisture can interfere with product performance.
1. Inspect the Surface
Check for cracks, loose pavers, oil stains, deteriorated joints, and existing coatings. Identify repairs that should be completed before cleaning or sealing.
2. Clean the Driveway
Remove loose debris and use a suitable cleaning method for the material. Treat oil stains separately when necessary, and rinse away cleaning residues.
3. Allow Sufficient Drying Time
Many sealers require the surface to be dry before application. The necessary drying period depends on the material, weather, humidity, and product instructions.
4. Replenish Joint Sand if Required
For compatible paver installations, repair or replenish joint sand after cleaning and once the surface is appropriately prepared.
The new material must be installed and cured according to the manufacturer’s requirements before the next stage.
5. Apply the Appropriate Sealer
Apply the selected product at the recommended coverage rate and under suitable weather conditions.
Avoid applying too much product, as excessive application may lead to residue, uneven appearance, or other finish problems.
6. Allow the Sealer to Cure
Keep foot and vehicle traffic off the surface for the period specified by the manufacturer. Premature use can affect the finish and performance.
This organized process helps support a more durable result than washing and sealing without adequate preparation.
Can Sealing Help Prevent Weeds Between Pavers?
Sealing can help protect some paver surfaces and, with suitable products, may contribute to joint stabilization. However, it is not a guaranteed weed-prevention solution.
Weeds can establish themselves when seeds settle into organic debris or gaps between pavers. Windblown soil, decomposing leaves, and moisture can create conditions that support growth.
To help reduce weeds:
Remove existing vegetation and organic debris.
Maintain joint sand according to the installation requirements.
Repair gaps where joint material has been lost.
Address drainage problems that contribute to persistent moisture.
Use a compatible sealer only when appropriate for the paving system.
Weeds may also grow from below the paving or through damaged joints, so surface sealing alone may not resolve the underlying cause.
How Often Should You Pressure Wash and Seal Your Driveway?
The ideal maintenance schedule depends on the material, traffic, weather exposure, and the amount of dirt and staining.
Concrete driveways may need periodic cleaning when visible buildup develops. Paver installations may also require joint inspections and occasional sand replenishment.
Sealing intervals vary by product and surface conditions. Some sealers require more frequent reapplication than others, so homeowners should follow the manufacturer’s recommendations rather than automatically resealing every year.
Consider arranging an inspection when you notice:
Persistent oil or grease stains.
Algae or dirt buildup.
Joint sand washing out.
Loose or shifting pavers.
A sealer that is peeling, cloudy, or wearing unevenly.
Water pooling or draining incorrectly across the paved area.
Regular inspection helps identify the type of maintenance needed without subjecting the surface to unnecessary pressure washing or repeated sealing.
Common Mistakes to Avoid When Cleaning and Sealing Pavers
Using excessive pressure: Aggressive washing can damage concrete, roughen paver surfaces, and remove joint sand.
Ignoring oil stains before sealing: Remaining oil may affect sealer adhesion and leave discoloration beneath the finish.
Applying sealer to a damp surface: Some products require completely dry paving. Trapped moisture can cause cloudiness or interfere with curing.
Leaving polymeric sand residue on pavers: Residue left on the surface may create a haze after the product is activated.
Sealing unstable pavers: Loose pavers and damaged joints should be addressed before applying a protective product.
Choosing an incompatible sealer: A product designed for one type of surface may not be suitable for another.
Ignoring drainage: Sealing will not correct an underlying drainage problem that causes water to pool or wash away joint material.
Careful preparation and material compatibility are essential for effective hardscape maintenance.
Why Choose Sparkle Windows for Exterior Cleaning?
Driveways, patios, and pavers contribute to the overall appearance of a property’s exterior. Maintaining these surfaces requires appropriate cleaning methods, attention to existing damage, and a clear understanding of the materials involved.
Sparkle Windows understands the importance of careful exterior cleaning and maintaining an attractive property. When planning driveway or paver maintenance, homeowners should consider the surface material, the type of staining, the condition of the joints, and whether sealing is appropriate.
A suitable cleaning plan should address visible contamination without unnecessarily damaging the surface. Where paver joints require repair or a sealer is being considered, the work should follow the relevant product instructions and surface requirements.
Before arranging a service, consider the size of the paved area, any persistent oil stains, and whether the pavers have existing joint sand or sealer. These details help establish the scope of work and the appropriate maintenance approach.
Final Thoughts
Pressure washing driveways and pavers can restore a cleaner appearance, remove accumulated dirt, and prepare compatible surfaces for additional maintenance. However, effective hardscape restoration requires more than high-pressure water.
Surface cleaner attachments can improve cleaning consistency, while suitable degreasers help address oil stains. Polymeric sand replenishment can restore deteriorated joints, and compatible penetrating or film-forming sealers may provide additional protection when correctly applied.
The best results come from inspecting the surface, choosing suitable cleaning methods, preparing the material properly, and allowing sufficient time for sand and sealer products to cure.
Ready to refresh your property’s exterior? Contact Sparkle Windows to discuss your exterior cleaning needs and explore suitable options for maintaining your driveway and paved surfaces.